
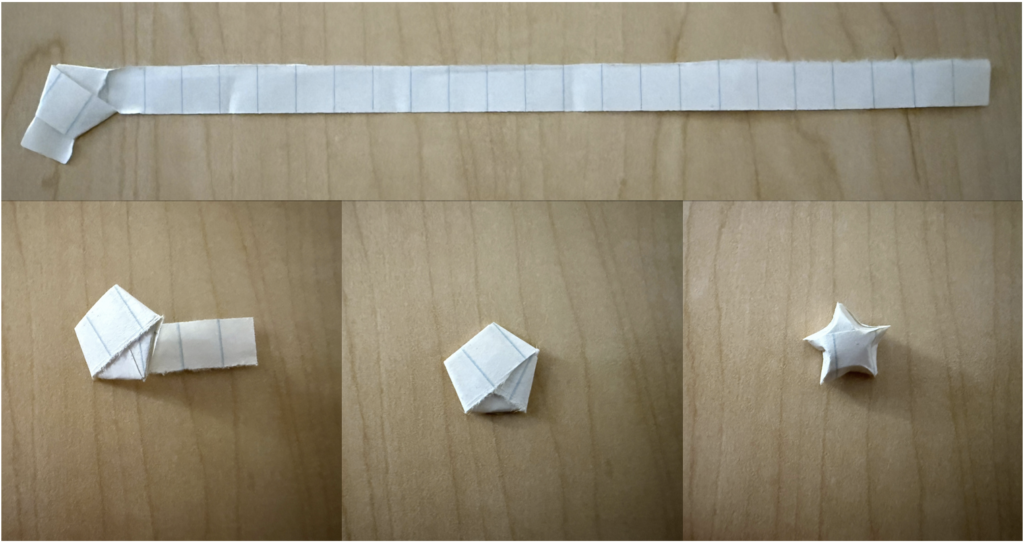
I don’t know about you, but I am completely incapable of sitting still. I constantly have to be doing something with my hands. One of my personal favorite mindless tasks is folding paper stars.
This can be a bit challenging to get the hang of at first, but once you do, you will be able to make dozens without even thinking about it.
To make your stars, start with a long, thin strip of paper. There is no folding and unfolding like with your typical origami. Start with basically tying it in a knot.
Wrap one end of the paper around the tip of your index finger, making a small loop with one long tail. Take the tail and thread it through the loop, pulling it tight. Now you have a pentagon with a long tail.
Take your tail and just wrap it around the pentagon, following the edges and changing directions slightly with each fold. Fold until your tail has shrunk dramatically. Take the leftover tail and tuck it in under.
Now you have a flat, paper pentagon, how exciting! It is finally time to actually make the star. Pinch each edge of the pentagon to bring them to a point. Now you have a paper star!
This activity doesn’t stop here. There are so many things that can be done with your stars.
First, a “beaded” curtain for your dorm room doorway. I would personally use an embroidery needle but it is safe to say not everyone has one at their disposal. A simple sewing needle and thread will do just fine.
Take a super long piece of sewing thread, fold it in half, and thread your needle. Tie the two ends of the thread together on the bottom and push your needle through your first star.
If you have any, I would alternate between stars and beads, if for no other reason than to decrease the amount of folding you have to do. If you have no beads on hand, no problem, I hope you like origami.
Thread these until you have a bunch of long strings of stars, and tape them up on your door frame.
Second, a fairy lights wine bottle, with a little extra twinkle (get it?). Take an empty wine bottle, or any large bottle will do if you’re under 21.
Wrap up your fairy lights and work them into the bottle. Arrange them until you like the pattern, then slowly add your stars. Add them slowly, allowing them to settle around the lights without blocking them. Once you have completely filled your bottle, you now have window shelf decor for your everyday millennial! Possibly even a fire hazard, so maybe don’t keep this one in your dorm.
Lastly, jewelry. Using the same technique as the curtain, thread your needle and get to work. Thread one or two stars, then tie them to an earring hook. Thread enough to fit around a wrist and fix them with lobster clasps, or just tie it on. Make necklaces or waist beads, rings or anklets, really you can use these stars for whatever your heart desires.
Go ahead and give it a try, and I would love to see your own unique creations.